Cynthion is a versatile USB debugging and development platform designed for hardware hackers and security researchers. It enables real-time USB packet inspection, protocol emulation, and advanced debugging, making it ideal for analysing and reverse engineering USB-based protocols.
In this blog post, I’ll demonstrate how to use hardware emulation to spoof an Android device with ADB enabled. Using Cynthion’s hardware emulation capabilities, we’ll make a computer think it’s connected to a real Android phone and implement just enough of the ADB protocol to handle basic commands.
Protocol Analysis
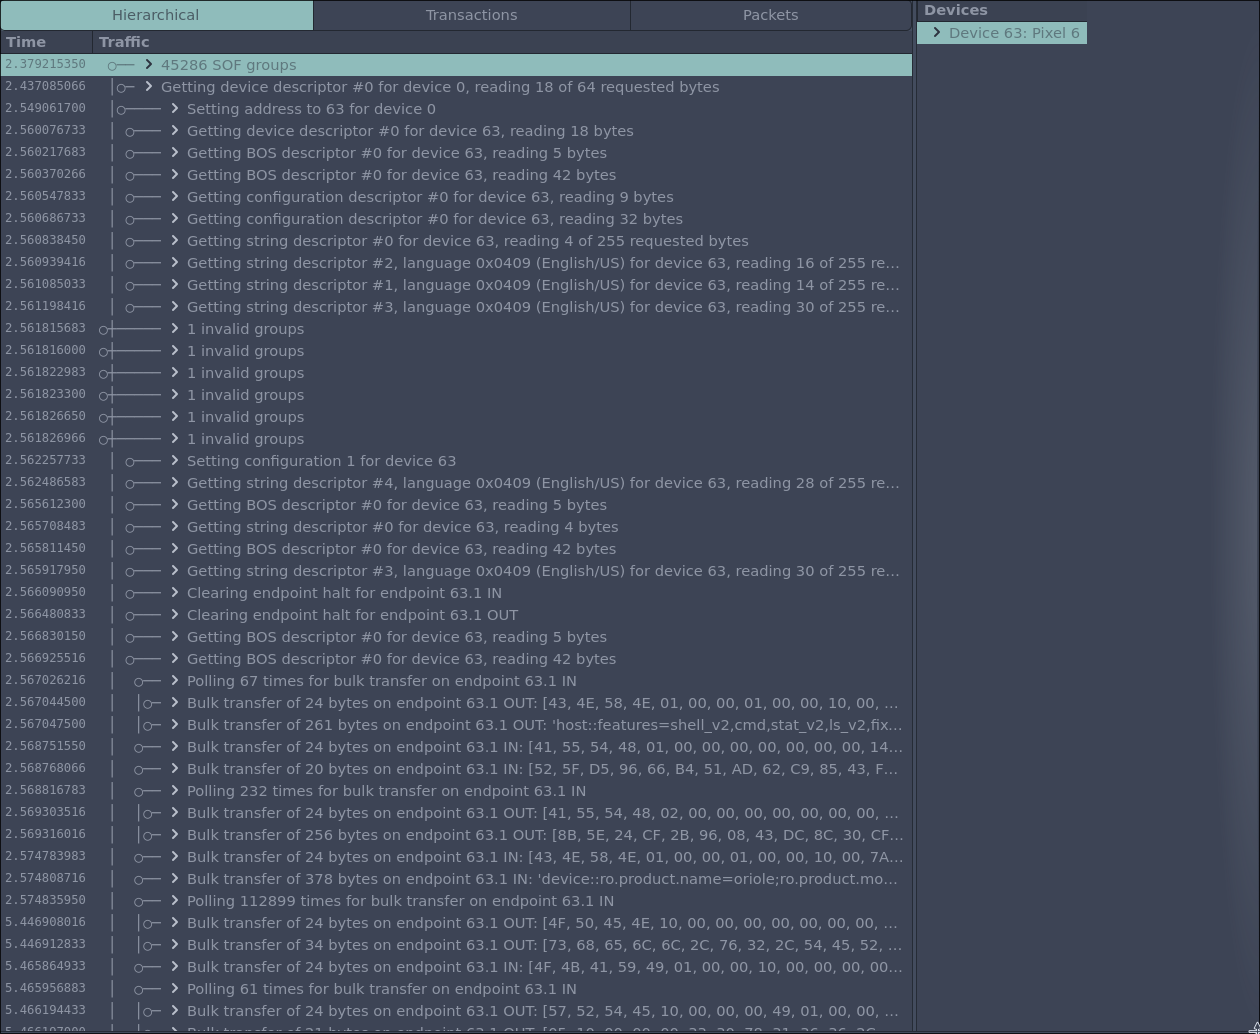
To emulate a USB device, we first need to understand how it presents itself to the host and what communication occurs. With this information, we can create an emulation setup. Cynthion can be used as a USB protocol analyser. To start sniffing USB packets, first connect load the tracer firmware onto the device, then connect up the Cynthion device as described in the documentation
❯ cynthion run analyzer
Uploading target bitstream to FPGA with 222030 bytes...
Operation complete!With this firmware running, Packetry can be used to sniff packets.
Info
Packetry is a protocol analyser specifically designed to be used with a Cynthion device. Think of it like a Wireshark tailored for USB. Read the docs here
Creating the USB Device class
USB classes are essentially what save you from having to install a new device driver for every keyboard and mouse you buy. USB-IF created a set of classes that allow devices with similar functionality to use a single driver on the host computer. Keyboards and mice are HID devices, headsets are Audio devices, Webcams are video devices, and so on. When devices cannot conform to a standard class, the manufacturer implements a non-standard class, known as a Vendor Specific Class.
Do not confuse USB Devices with USB Device classes
In the context of USB Device classes, we are actually discussing a specific functionality of a single USB Class. Modern platforms such as Android devices are composite devices, meaning they implement multiple interfaces belonging to different USB classes. For example, an Android device may similtaniously expose endpoints such as
- A Mass Storage device
- A Media Transfer Protocol (MTP) device
- A Vendor-Specific device for the Android Debug Bridge (ADB).
Device Descriptor
The device descriptor is the top-level descriptor of a USB device. This is the first thing the host asks for when a USB device is plugged in, containing information such as the vendor and product IDs.
By selecting the device descriptor from the devices tab in Packetry, it can be saved to a file. Packetry is capable of dissecting a variety of common USB transactions, which allows you to pull out information like this.
❯ xxd device.bin
00000000: 1201 1002 0000 0040 d118 e74e 1005 0102  .......@...N....
00000010: 0301                                     ..
The Facedancer library provides a way to parse the raw bytes and create a USB device descriptor.
Info
Packetry/Facedancer don’t currently provide a way to automatically resolve the string references, so this should be done manually. The strings can be copied out of the devices tab, and the transaction contains the string descriptor reference number. e.g.
Getting string descriptor #2, language 0x0409 (English/US) for device 36, reading 16 of 255 requested bytes: 'Pixel 6'
In [11]: device_data = open("./device.bin", "rb").read()
    ...: strings = {1: "Google", 2: "Pixel 6", 3: "25161FDF60012T"}
    ...: device = USBDevice.from_binary_descriptor(device_data, strings=strings)

In [12]: print(device.generate_code())

@use_inner_classes_automatically
class Device(USBDevice):
    device_speed             = None
    device_class             = 0
    device_subclass          = 0
    protocol_revision_number = 0
    max_packet_size_ep0      = 64
    vendor_id                = 0x18d1
    product_id               = 0x4ee7
    manufacturer_string      = (1, 'Google')
    product_string           = (2, 'Pixel 6')
    serial_number_string     = (3, '25161FDF60012T')
    supported_languages      = (LanguageIDs.ENGLISH_US,)
    device_revision          = 0x0510
    usb_spec_version         = 0x0210

    class Configuration_1(USBConfiguration):
        number                 = 1
        configuration_string   = None
        max_power              = 500
        self_powered           = True
        supports_remote_wakeup = True
Currently the Configuration is just a placeholder, so the next step is to import the actual data.
Configuration and Interface Descriptors
Configuration descriptors define the overall configuration of the USB device, such as power and features available over USB. A single device can have multiple configurations, but a host will only use one at a time. Within this configuration, the Interface Descriptor defines a specific, independent function of the device, such as the ADB functionality. These interfaces contain one or more Endpoint Descriptors, which are the data pipes that enable communication.
Device Descriptor
├── Configuration Descriptor
    ├── Interface Descriptor
        ├── Endpoint Descriptor
We can repeat the process from above to extract the raw binary data from Packetry, and parse it using Facedancer
In [35]: device_data = open("./device.bin", "rb").read()
    ...: config_data = open("./config.bin", "rb").read()
    ...: interface_data = open("./interface0.bin", "rb").read()
    ...: endpoint1_in_data = open("./endpoint1_in.bin", "rb").read()
    ...: endpoint1_out_data = open("./endpoint1_out.bin", "rb").read()
    ...: device = USBDevice.from_binary_descriptor(device_data, strings=strings)
    ...: config = USBConfiguration.from_binary_descriptor(config_data, strings=strings)
    ...: interface = USBInterface.from_binary_descriptor(interface_data, strings=strings)
    ...: interface.add_endpoint(USBEndpoint.from_binary_descriptor(endpoint1_in_data))
    ...: interface.add_endpoint(USBEndpoint.from_binary_descriptor(endpoint1_out_data))
    ...: config.add_interface(interface)
    ...: device.add_configuration(config)
    ...: print(device.generate_code())

@use_inner_classes_automatically
class Device(USBDevice):
    device_speed             = None
    device_class             = 0
    device_subclass          = 0
    protocol_revision_number = 0
    max_packet_size_ep0      = 64
    vendor_id                = 0x18d1
    product_id               = 0x4ee7
    manufacturer_string      = (1, 'Google')
    product_string           = (2, 'Pixel 6')
    serial_number_string     = (3, '25161FDF60012T')
    supported_languages      = (LanguageIDs.ENGLISH_US,)
    device_revision          = 0x0510
    usb_spec_version         = 0x0210

    class Configuration_1(USBConfiguration):
        number                 = 1
        configuration_string   = None
        max_power              = 500
        self_powered           = False
        supports_remote_wakeup = False

        class Interface_0(USBInterface):
            number           = 0
            alternate        = 0
            class_number     = 255
            subclass_number  = 66
            protocol_number  = 1
            interface_string = (4, 'ADB Interface')

            class Endpoint_1_OUT(USBEndpoint):
                number               = 1
                direction            = USBDirection.OUT
                transfer_type        = USBTransferType.BULK
                synchronization_type = USBSynchronizationType.NONE
                usage_type           = USBUsageType.DATA
                max_packet_size      = 512
                interval             = 0
                extra_bytes          = bytes([])

            class Endpoint_1_IN(USBEndpoint):
                number               = 1
                direction            = USBDirection.IN
                transfer_type        = USBTransferType.BULK
                synchronization_type = USBSynchronizationType.NONE
                usage_type           = USBUsageType.DATA
                max_packet_size      = 512
                interval             = 0
                extra_bytes          = bytes([])
After fixing up the code a little and importing the class into a script, it should look something like this
from facedancer import *
from facedancer import main


@use_inner_classes_automatically
class ADBPixel(USBDevice):
    device_speed = None
    device_class = 0
    device_subclass = 0
    protocol_revision_number = 0
    max_packet_size_ep0 = 64
    vendor_id = 0x18D1
    product_id = 0x4EE7
    manufacturer_string = "Google"
    product_string = "Pixel 6"
    serial_number_string = "25161FDF60012T"
    supported_languages = (LanguageIDs.ENGLISH_US,)
    device_revision = 0x0510
    usb_spec_version = 0x0210

    class Configuration_1(USBConfiguration):
        number = 1
        configuration_string = None
        max_power = 500
        self_powered = False
        supports_remote_wakeup = False

        class Interface_0(USBInterface):
            number = 0
            alternate = 0
            class_number = 255
            subclass_number = 66
            protocol_number = 1
            interface_string = "ADB Interface"

            class Endpoint_1_OUT(USBEndpoint):
                number = 1
                direction = USBDirection.OUT
                transfer_type = USBTransferType.BULK
                synchronization_type = USBSynchronizationType.NONE
                usage_type = USBUsageType.DATA
                max_packet_size = 512
                interval = 0
                extra_bytes = bytes([])

            class Endpoint_1_IN(USBEndpoint):
                number = 1
                direction = USBDirection.IN
                transfer_type = USBTransferType.BULK
                synchronization_type = USBSynchronizationType.NONE
                usage_type = USBUsageType.DATA
                max_packet_size = 512
                interval = 0
                extra_bytes = bytes([])


main(ADBPixel)
Testing the Script
To test the script, flash the Cynthion with the facedancer firmware and rewire the board.
When running lsusb, an Android device will be detected, with annotation that debugging is enabled on the device.
❯ cynthion run facedancer
Updating SoC firmware flash with 59328 bytes...
Operation complete!
Uploading target bitstream to FPGA with 397055 bytes...
Operation complete!

> lsusb -d 18d1:4ee7
Bus 001 Device 058: ID 18d1:4ee7 Google Inc. Nexus/Pixel Device (charging + debug)
When running adb devices, a device is shown, however it’s displaying as offline.
❯ adb devices
List of devices attached
25161FDF60012T  offline
This is because ADB server on the host is attempting to communicate with the device, but the responses have not been implemented
INFO    | endpoint       | EP1 received 24 bytes of data; but has no handler.
INFO    | endpoint       | EP1 received 64 bytes of data; but has no handler.
INFO    | endpoint       | EP1 received 64 bytes of data; but has no handler.
INFO    | endpoint       | EP1 received 64 bytes of data; but has no handler.
INFO    | endpoint       | EP1 received 64 bytes of data; but has no handler.
INFO    | endpoint       | EP1 received 5 bytes of data; but has no handler.
Implementing the ADB Protocol
Initial Connection
The first transaction after the device setup is a bulk transfer. The first 4 bytes decodes to CNXN , which matches up with this blog, showing it’s an initial connection request. 43, 4E, 58, 4E is ascii CNXN
Transaction #267 with 3 packets
Timestamp: 187,396,200 ns from capture start
Packets: #1581 to #1583
OUT transaction on device 36, endpoint 1 with 24 data bytes, ACK response
Payload: [43, 4E, 58, 4E, 01, 00, 00, 01, 00, 00, 10, 00, 05, 01, 00, 00, 47, 66, 00, 00, BC, B1, A7, B1]
We can pack/unpack ADB message headers to better display and handle them.
class Message:
    def __init__(self, command, arg0, arg1, data_length, data_crc32, magic):
        self.command = struct.pack("=I", command)
        self.arg0 = arg0
        self.arg1 = arg1
        self.data_length = data_length
        self.data_crc32 = data_crc32
        self.magic = magic

    def pack(self):
        return struct.pack(
            "=I I I I I I",
            struct.unpack("=I", self.command)[0],
            self.arg0,
            self.arg1,
            self.data_length,
            self.data_crc32,
            self.magic,
        )

    def __str__(self):
        message = f"command: {self.command}\n"
        message += f"arg0: {self.arg0}\n"
        message += f"arg1: {self.arg1}\n"
        message += f"data_length: {self.data_length}\n"
        message += f"data_crc32: {self.data_crc32}\n"
        message += f"magic: {self.magic}\n"
        return message

    @classmethod
    def unpack(cls, buffer):
        unpacked_data = struct.unpack("=IIIIII", buffer)
        return cls(*unpacked_data)
The device responds to the CNXN transaction with an authentication challenge. This involves sending 20 bytes of ‘random’ data for the host to sign with it’s private key.
def send_auth_challenge(self):
    self.connection_state = DEVICE_CONNECTING
    challenge = bytes.fromhex("51f1a602004c488588d069f17d7321fad1650d2f")
    response = Message(
        command=int.from_bytes(b"AUTH", "little"),
        arg0=AUTH_TYPE_CHALLENGE,
        arg1=0,
        data_length=len(challenge),
        data_crc32=sum(challenge) ^ 0xFFFFFFFF,
        magic=int.from_bytes(b"AUTH", "little") ^ 0xFFFFFFFF,
    )
    return [response.pack(), challenge]
Authentication
The device responds to this request with an AUTH challenge (41, 55, 54, 48 is AUTH). The first transaction is the AUTH message header, a second transaction
contains the auth challenge material. This is interesting because documentation such as the Synactiv blog post seemed to imply that a messages header and contents was
bundled in the same transaction. They do, however, account for this in their implementation of ADB.
Transaction #285 with 3 packets
Timestamp: 187,753,034 ns from capture start
Packets: #1616 to #1618
IN transaction on device 36, endpoint 1 with 24 data bytes, ACK response
Payload: [41, 55, 54, 48, 01, 00, 00, 00, 00, 00, 00, 00, 14, 00, 00, 00, 00, 00, 00, 00, BE, AA, AB, B7]

Transaction #286 with 3 packets
Timestamp: 187,766,217 ns from capture start
Packets: #1619 to #1621
IN transaction on device 36, endpoint 1 with 20 data bytes, ACK response
Payload: [4C, BF, 28, 3B, F2, 2F, EC, 13, 56, 95, 6B, 0E, 62, 66, 8F, 37, 59, 42, DB, ED]
The host will sign the 20 bytes of random data with it’s private key and send that signed data back to the device.
Info
Handling messages sent over multiple transactions required introducing a state machine into the code. This involved parsing the message header to get the expected message data size, and recieving transactions until everything has been recieved before handling the message
Transaction #310 with 3 packets
Timestamp: 188,297,834 ns from capture start
Packets: #1664 to #1666
OUT transaction on device 36, endpoint 1 with 24 data bytes, ACK response
Payload: [41, 55, 54, 48, 02, 00, 00, 00, 00, 00, 00, 00, 00, 01, 00, 00, CF, 82, 00, 00, BE, AA, AB, B7]

Transaction #311 with 3 packets
Timestamp: 188,299,934 ns from capture start
Packets: #1667 to #1669
OUT transaction on device 36, endpoint 1 with 256 data bytes, ACK response
Payload: [87, 9B, 81, 02, CA, 0C, 81, A7, 10, A4, DA, 36, 3B, FD, 8C, 49, 1A, 32, A8, 40, 58, 7C, E0, C9, 1E, 5F, 00, 98, 9D, 66, DE, 18, F1, B2, C6, 73, 28, 37, 70, 18, 39, B2, FC, 3E, D8, 6B, A6, EC, CB, 88, EF, D6, EC, 3C, 0E, A3, D0, B6, FC, 9B, 22, 04, CF, D1, 58, 5D, 5E, 26, 4F, EC, F4, A7, 5B, 70, 49, D6, D5, AE, C0, D4, FE, 6F, 5A, D2, 37, 41, B6, E5, B1, 67, C7, DA, EF, AD, D3, DB, F1, C3, B8, 61, 0F, F7, FA, A8, EA, E8, 10, BA, 6B, 48, 2E, 08, 75, 35, A4, 4D, 90, 28, 14, 7A, C1, 4C, FC, AD, 3A, 20, 6B, C7, 08, 4C, 3A, 54, 05, 04, BB, 1D, 1E, 0D, 27, 42, BD, 43, E3, 03, C2, 66, 61, 49, 1A, 6F, 61, F5, 72, 7F, 33, 3A, 0D, 04, 73, 6A, F8, 2B, 44, 04, D4, C7, 78, A0, 43, 4F, 6C, 6B, 6C, 90, 75, 2B, D2, 6B, 9F, B1, C1, 7D, F1, 97, 62, CD, BC, F1, 84, 5E, 9A, BE, 2E, 89, FC, AF, 83, B0, DD, 94, 10, 80, 53, BB, 73, B2, BE, AC, 73, 1C, 9D, AA, B0, 09, F0, CA, 6C, EF, E1, 85, 7A, 52, D9, DE, 3D, 5E, DF, 90, 89, 3C, E6, 55, ED, D9, 45, 41, 9E, 15, 26, EF, E8, 26, 27, 64, D3, F8, 71, A2, 34, F2, B3, 18, 0D, 00, A6, 70]
The device calculates whether the two devices have been paired before by verifying the signed data against the stored public keys of previously connected devices. If there is not an known key, it would trigger an authentication request to the user. Since we just want to establish a session, we can accept any returned data - since the RSA keys are only used to device verification, not message encryption.
def handle_auth(self):
    self.connection_state = DEVICE_CONNECTED
    data = b"device::ro.product.name=oriole;ro.product.model=Pixel_6"
    response = Message(
        command=int.from_bytes(b"CNXN", "little"),
        arg0=16777217,
        arg1=1048576,
        data_length=len(data),
        data_crc32=sum(data) ^ 0xFFFFFFFF,
        magic=int.from_bytes(b"CNXN", "little") ^ 0xFFFFFFFF,
    )
After adding this functionality into the Python script, a connected device should be shown by adb server.
b'CNXN\x01\x00\x00\x01\x00\x00\x10\x00\x05\x01\x00\x00Gf\x00\x00\xbc\xb1\xa7\xb1'
command: b'CNXN'
arg0: 16777217
arg1: 1048576
data_length: 261
data_crc32: 26183
magic: 2980557244

b'host::features=shell_v2,cmd,stat_v2,ls_v2,fixed_push_mkdir,apex,'
Expecting another 197 bytes
b'abb,fixed_push_symlink_timestamp,abb_exec,remount_shell,track_ap'
Expecting another 133 bytes
b'p,sendrecv_v2,sendrecv_v2_brotli,sendrecv_v2_lz4,sendrecv_v2_zst'
Expecting another 69 bytes
b'd,sendrecv_v2_dry_run_send,openscreen_mdns,devicetracker_proto_f'
Expecting another 5 bytes
b'ormat'
Expecting another 0 bytes
b'AUTH\x02\x00\x00\x00\x00\x00\x00\x00\x00\x01\x00\x00(\x80\x00\x00\xbe\xaa\xab\xb7'
command: b'AUTH'
arg0: 2
arg1: 0
data_length: 256
data_crc32: 32808
magic: 3081480894

b'\xa2\xcc\xfc\xe7\xfcs\xe1$\xa3In~\xa60\xa6\x1f\xc1N7^jT\xe53\xd2\\\xee\xa7J<fk\xee?\xd9G\xb7v\x94rzp\x89~\xaa\xbee\x83\xfe\x16\xb8\xfa\xc5}\xe2\x82\xa5\x9e\x13\xc2\x14}AJ'
Expecting another 192 bytes
b'\xb5)6\xcf\xc19\xda\xdd\xa9Y\xa3\xf5\xff\x90\xc2\x189\xa3\xf3\xe5`\xd4\x9d>\xf7\x90\xb3!c\x8ec\x9b\xd4dG=\x8b.\xa3\x061\x8e\xd5\x03eG&\xd8 \xd9P\xe6+\xf9\xaf:\xc7\x82U\x91\xa2m\xee^'
Expecting another 128 bytes
b'\xc4\x1e\xc0\xbf I\xf0\xf3\x00.v\x8b#\x01\x87K\xcf\xab\xcfZ\xf9\xd9t/\x97\x14\x83\xa9\xae\xfaKp\x1b;\x98\xaa&j\xeefX\x16lE\xef*\xb3\x1b^\xdde\x88\xf8\xa4v\xe40l\x7f\xad\x1f\x19\x1a\xbd'
Expecting another 64 bytes
b"\xe1\xa2\x89`'\xb5\xb10\x1e\x90w\ty\xbdU\xdf<\x81s!\x12\x1d\x92\x8f\xe3(~\x07\xf7!$\xf6\xf8 bW\xfe\xbe\xddL\r\xab\xfb2@S\x93\x06\xf5/q\xe2\xbfS\x12\x1a\xea\x9a\xfe\x85EN\x1bB"
Expecting another 0 bytes
❯ adb devices -l
List of devices attached
25161FDF60012T         device 1-10 product:oriole model:Pixel_6 transport_id:165
Executing Commands
The main use case for hardware emulation of a device to spoof traffic, rather than just spoof that the device exists. Spoofing shell commands over adb is relatively simple - the general flow of a shell command executed via ADB is the following
- The host sends the device an OPEN message. The message header contains the
local_idnumber of the session. The body of the message contains the stream destination and command to execute - The device responds with an OKAY message it’s own
local_id, along with theremote_idwhich corresponds to thelocal_idof the host. These identifiers are how multiple sessions can be differenciated. - The device responds with a WRTE message, containing the result of the executed command.
An example of implementing this behaviour for a simple ‘id’ command could look like this.
def handle_open(self, local_id, data):
    if data[:6] == b"shell:":
        command = data[6:].strip(b"\x00")
        print(command)
        match command:
            case b"id":
                result = b"uid=2000(shell) gid=2000(shell) groups=2000(shell)\n\x00"
                open_response = Message(
                    command=int.from_bytes(b"OKAY", "little"),
                    arg0=25,
                    arg1=local_id,
                    data_length=0,
                    data_crc32=0,
                    magic=int.from_bytes(b"OKAY", "little") ^ 0xFFFFFFFF,
                )
                wrte_response = Message(
                    command=int.from_bytes(b"WRTE", "little"),
                    arg0=25,
                    arg1=local_id,
                    data_length=len(result),
                    data_crc32=0,
                    magic=int.from_bytes(b"WRTE", "little") ^ 0xFFFFFFFF,
                )

                return [open_response.pack(), wrte_response.pack(), result]
Warning
Implementing support for other stream destinations or an interacting shell session would be slighly more complicated, and isn’t really the focus of this blog post
[Host to Device]
command: b'OPEN'
arg0: 308 (Host local_id)
arg1: 0
data_length: 9
data_crc32: 0
magic: 2981801904

Payload: b'shell:id\x00'

[Device to Host]
command: b'OKAY'
arg0: 25 (device local_id)
arg1: 308 (host local_id)
data_length: 0
data_crc32: 0
magic: 2797515952

[Device to Host]
command: b'WRTE'
arg0: 25 (device local_id)
arg1: 308 (host_localid)
data_length: 52
data_crc32: 0
magic: 3131813288

Payload: b'uid=2000(shell) gid=2000(shell) groups=2000(shell)\n\x00'
This creates the following behaviour
❯ adb shell id
uid=2000(shell) gid=2000(shell) groups=2000(shell)
Conclusion
Emulating hardware devices can be very useful for red teaming and vulnerability research. It allows you to interact with a device as if there is hardware present, which can be useful for products that are hard to aquire, or when you cannot connect sensitive hardware to untrusted devices.
Additonally, by emulating a device, you can manipulate communication and exploit vulnerabilities in the host’s USB stack - a common tactic of forensics companies. I hope this post showed how one might go about creating an MVP of an emulated device.